home-made reusable sandwich or snack bag
This Christmas my very crafty and fashionable friend Erin made reusable bags for people. She gave me three. They are great and I've been using them. She made hers with cotton for the outside and vinyl on the inside (I believe - Erin, correct me if I'm wrong). They are machine washable and seal with velcro.
So it got me to thinking ... if you can make them with vinyl, maybe you could use a chip bag, too. As you'll note in my posting "Garbage Bag", I've been trying to think of ways to re-use chip bags instead of throwing them out - still not the best option, as not buying them in the first place would be less of an impact on the environment and my waistline, but, hey ... I'm trying.
So I've made a couple - having modified Erin's pattern a bit. The thing with using chip bags is this - you can't make your stitches too small or too straight if they are going to have any strain on them. Think of it this way - what happens when you punch a bunch of little holes close together through a fairly thin plastic bag in a straight line? Well it makes a great perferated line to tear along. So I use a wide and long zigzag for the side seams. A straight stitch seems to work on the seams that connect the fabric to the bag and the end seams.
So here you go. Step by step:
Start with a chip bag - or any other similarly sized bag
Cut off the top and bottom seam - this will reduce pucker.
Turn inside out.
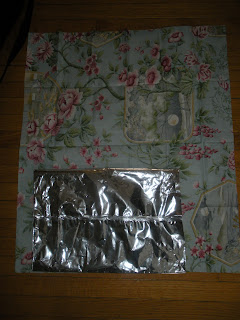
Cut a piece of fabric a little bit bigger than the bag (it actually needs to be the same size, but easier to trim if it's a bit big rather than cut it too small)
Sew the sides of the fabric onto the bag with the pale side out - use a straight stitch on both long edges.
Turn right-side out
Fold the short edges over and sew with straight stitch. At this point, you may want to put strips of velcro on both short edges - cover the fabric with the velcro, but also make sure the velcro adhesive is well attached to the chip bag - so the velcro straddles the two materials. It won't stick so well to the fabric.
Fold in half and sew the edges with a broad, long zig-zag.
And, Voila! Bag.


What an awesome idea! I was trying to figure out a more eco-friendly way of making them other than using vinyl (plastic). Like I said, I wanted to find oil cloth but apparently it's no where in Calgary.
ReplyDeleteBut what a great idea to reuse! I'll have to try that.
so i guess it machine washable too, have you tried that?
ReplyDeleteI just made it yesterday, so I haven't tried machine washing it - but it would rinse out well. I'll let you know if I wash it.
ReplyDeleteGreat tutorial! I have made a few of these, but I used a double-sided, iron-on bonding fabric to set the cotton fabric to the chip bag. I think this helps keep the chip bag from tearing once sewn. Less pull on the chip bag itself. I am not confident that they will make it through a washing cycle, so I just rinse/wipe them out. Thanks for the info! :)
ReplyDelete